HC-05/06 Bluetooth Programmer
I’ve compiled a bunch of information generally available on the Internet including a basic Arduino sketch to facilitate programming the ubiquitous HC-05/06 Bluetooth modules.
This sketch can be used with an Arduino such as an Uno or Nano to program the HC-05/06 modules via their respective “AT” commands.
Note that the HC-06 module does not have a “State” or “Key” pin, and the “Key” pin connection can simply be disregarded for these modules.
Danger
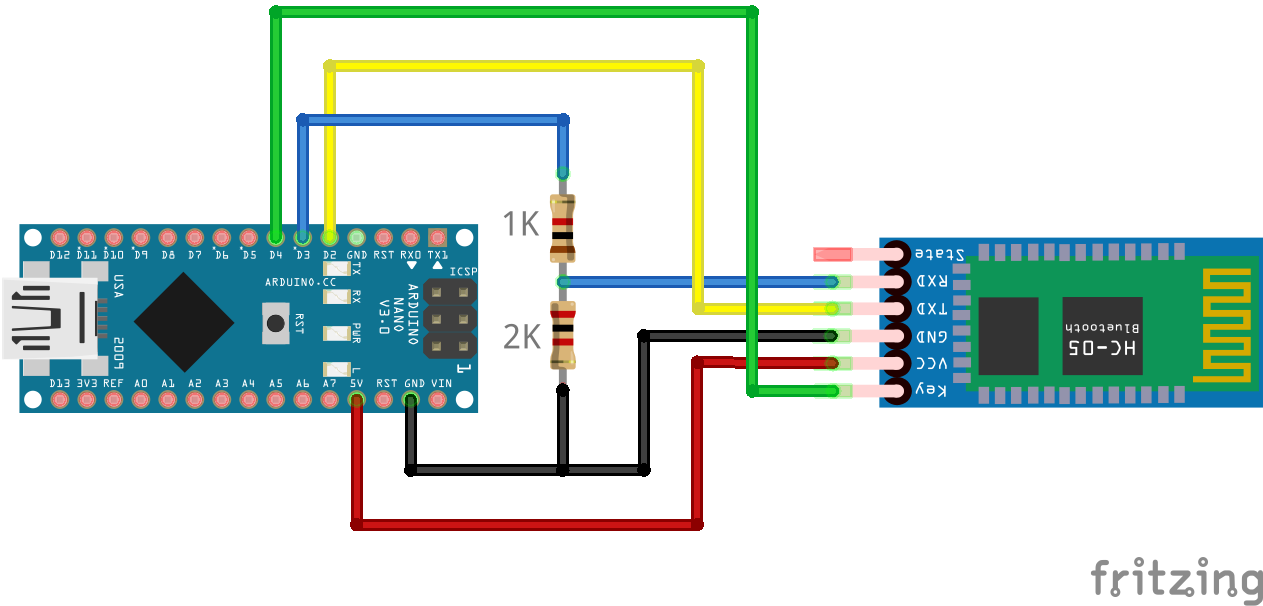
The HC-05/06 modules use 3.3V logic, so you must ensure that you use either a resistor divider or level shifter when connecting the Rx pin of the device you’re using to program it. Note the use of these in the connection diagram below.
HC-05 vs. HC-06
The HC-05 and HC-06 modules are visually almost identical, however the HC-05 has 6 pins and is capable of being both a master and slave Bluetooth device, whereas the HC-06 has 4 pins and can only be a slave device. The HC-05 has an extensive AT command set for programming, whereas the HC-06 is very limited, allowing changes only to the baud rate, name, and PIN.
The HC-05 has a dedicated mode to send the AT commands to program it, while the HC-06 can be programmed via AT commands any time it is not paired.
Programming the modules
The Arduino IDE’s Serial Monitor can be used to program either module successfully providing it is configured correctly for the specified module in the relevant section below.
The default settings for each module are likely to be:
Device name: HC-05 or HC-06
Pin: 0000 or 1234
Baud rate: 9600
Interactive programming sketch
The programming sketch can be found in my bluetooth-hc-programmer repository.
HC-05 programming
To program the HC-05 successfully, it needs to be powered on with the “Key” pin set high to enter the “AT” command mode.
The programming sketch in the previous section should place the HC-05 into “AT” command mode successfully, provided it is connected correctly, and your device has the “Key” pin available.
When the HC-05 is in “AT” command mode, the blue and red LEDs should blink slowly, around 2 seconds on/off. When not in this mode, the blue and red LEDs will blink rapidly.
If the HC-05 does not enter the “AT” command mode, ensure the “Key” pin is connected correctly, and try holding the button while powering on in case the “Key” pin is not connected internally within the module.
To send the required “AT” commands to the module, the Arduino IDE’s serial monitor must have the new line option set to “Both NL & CR”, and the baud rate set to “38400”.
To verify the device is ready and in “AT” command mode, enter “AT” and click “Send” (or press the <Enter> key), and the response “OK” should appear in the serial monitor.
Providing this has been successful, enter the following commands one at a time to configure the various options, and each one should return “OK” to confirm the command was received successfully:
AT+NAME=<DEVICENAME>
AT+PSWD=<PASSWORD>
AT+ROLE=0
AT+UART=115200,0,0
You may set <DEVICENAME> to be anything you wish (up to 31 characters), and <PASSWORD> can be up to a 16 character alpha-numeric password. The “AT+ROLE” command sets the HC-05 to “Slave” mode, and the “AT+UART” command sets the baud rate to 115200.
For example, to set the device name to “MyHC-05” and the password to “secret12345”, the entire command list to send would be:
AT+NAME=MyHC-05
AT+PSWD=secret12345
AT+ROLE=0
AT+UART=115200,0,0
Once you have completed programming the device, it will need to be power cycled, with the “Key” pin left low in order for the settings to take affect, and to exit the “AT” command mode.
You should then be able to pair to the device using the updated PIN.
HC-06 programming
Unlike the HC-05, the HC-06 module has no specific “AT” command mode, and can be programmed at any time it is not paired with another Bluetooth device. The HC-06 can only ever operate in “Slave” mode.
The programming commands must also be entered within a 1 second duration. This means the only effective way to send them is by using a serial console that lets you enter the complete command string in one go, and the Arduino IDE can be used for this.
To send the required “AT” commands to the module, the Arduino IDE’s serial monitor must have the new line option set to “No line ending”, and the baud rate set to “9600”.
Note that these settings take effect immediately, and therefore you should send the baud rate command last, otherwise you will effectively be disconnected from the HC-06 module.
To verify the device is ready and in “AT” command mode, enter “AT” and click “Send” (or press the <Enter> key), and the response “OK” should appear in the serial monitor.
Providing this has been successful, enter the following commands one at a time to configure the various options:, and each one should return “OK” to confirm the command was received successfully. Note that unlike the HC-05, the return text is slightly different for each command as noted:
AT+NAME<DEVICENAME> (returns OKsetname)
AT+PSWD=<PIN> (returns OKsetPIN)
AT+BAUD8 (returns OK115200)
You may set <DEVICENAME> to be anything you wish, whereas <PIN> must be a 4 digit number. The “AT+BAUD8” command sets the baud rate to 115200.
For example, to set the device name to “MyHC-06” and the PIN to “5432”, the entire command list to send would be:
AT+NAME=MyHC-06
AT+PSWD=5432
AT+ROLE=0
AT+UART=115200,0,0
You should now be able to pair to the device using the updated PIN.
How to pair a HC-05 with another HC-05/06
This outlines how to pair a HC-05 as a master device with another HC-05 in slave mode, or a HC-06.
You need to configure your slave device first as per the relevant section above.
Once done, validate your slave device is available with AT+INQ and note the address (eg. 00:02:72:0A:3C:7F). When specifying this device address in the “AT” commands below, it needs to be in “NAP,UAP,LAP” format, resulting in this example address becoming “0002,72,0A3C7F”.
These are the “AT” commands you will need to execute to configure your HC-05 to automatically pair with your slave HC-05/06 device:
AT
AT+MODE=1
AT+NAME=<DEVICENAME>          <<-- Set as desired
AT+UART=<BAUD>,0,0            <<-- Set as required by your throttle/controller's serial port baud rate
AT+PSWD=<PASSWORD|PIN>        <<-- Set to your slave device's password or PIN
AT+CMODE=1                    <<-- Set to pair with any device
<Something here to pair with slave device>
AT+CMODE=0                    <<-- Set to pair with the slave device only
In order, these commands will:
Validate ready for programming
Set master mode
Set the device name
Set the baud rate to match the throttle/controller baud rate
Set the password to match the slave device’s password (HC-05) or PIN (HC-06)
Set the device to pair with any Bluetooth device
<Pair with the slave device somehow, need to figure this bit out>
Set the device to pair with the slave device only
An example set of commands using HC-05 devices as both the master and slave:
<Slave commands>
AT
AT+NAME=MySlaveDevice
AT+PSWD=MySecret12345
AT+UART=115200,0,0

<Master commands>
AT
AT+MODE=1
AT+NAME=MyMasterDevice
AT+UART=115200,0,0
AT+PSWD=MySecret12345
AT+CMODE=1
<Pairing command(s)>
AT+CMODE=0